morribm
-
Posts
78 -
Joined
-
Last visited
-
Days Won
4
Recent Profile Visitors
1,604 profile views


morribm's Achievements
")


-
Thanks for the clarification Pete. I realise some suspensions will need more done than others but I guess the question I was asking is given that we have done pretty much the same amount of off-road travel, why is it that some suspensions appear to have need of more being done to them than others? I also suspect there isn't a single answer to the question and perhaps the best answer would be "because they just do!" 😊 Cheers Brian
-
I'm blown away by the cost of the 'services' as outlined above. Both Chris and KenG seem to have had a complete suspension rebuild IMHO. I've just had my nine year old ATV2 suspension serviced, and I add our van has done some hard yards over the years, at a total cost of $328. I spent time with the mechanic after the service to find out exactly what he had done and to my mind he did all of the essential stuff. I will need magnets on one wheel replaced the next time I have it serviced. I had a service done at Kedron a couple of years back and the cost was pretty much in the ballpark that Havago was charged. I do my own greasing of the suspension fairly regularly -- certainly before any long trip and sometimes during the trip as well but that's not going to affect the backing plates, and drums at all. So why the difference? Anything to do with driving techniques perhaps? Or something else?
-
Hi Rob, I too recently had confusing reports from my eLite monitor and I posted on this forum. My issue was that the monitor was continually flashing 'synchronise' even immediately after synchronising! Very frustrating. I will add that I had my three AGM batteries replaced with three 130 Amp hour ones about a year previously when in Kununurra (that was all they could get from Darwin at the time) and they had been working normally and there were no synchronisation issues. What I eventually discovered almost by chance that there was an unconnected cable lying loose tucked in behind the battery bank which appeared to suggest that my three batteries were not connected correctly at changeover! Once this was corrected, the problem was solved. I don't know why everything seemed so normal for so long before the eLite started registering the synchronise message. So, I suspect your charger is OK and the problem lies with your batteries. You failed to mention why only two of your batteries were replaced and I would venture that the remaining 'old' battery is the mischief maker. Also, it would be interesting to know how your setup works on solar power only i.e. take the 240V charger out of the equation altogether. Good luck! Brian
-
No, I did not measure the voltage at the terminals but rather thought that since the battery was on charge without any outgoings (amps) for several days, the charge as indicated at the monitor would represent faithfully that at the terminals. Right? And you are correct, I can't get at my electrolyte. Sealed AGMs.
-
I'm having a bit of an issue with my battery monitor. I has always worked perfectly well in the past for instance, when the monitor 'Synchronise' function flashes, pressing the two outside buttons simultaneously has resulted in "Full" being displayed in accordance with the manual. I have the van on 240V external power charging so I'm not relying on solar alone. More recently, when the 'Synchronise' notification has been flashing, going through the process of pressing the two outside buttons simply results in the display showing 100% with both the A(mps) and the A/Hr reverting to 0. Which is all good. Or is it? I must mention too that although the flashing 'synchronise' notification will stop flashing, this will be for about 20 secs max before it starts flashing again. My reading on a very comprehensive US boating site indicates that 100% doesn't necessarily mean Full and explains that the 100% is only what the monitor algorithm will show by calculation but doesn't really mean the battery is fully charged. Yeah, this may be splitting hairs but the algorithm apparently stores data from previous synchronisations and any errors that may have been accumulated in time like for instance synchronising when the two parameters of F01 and F02 are not met, can be responsible for this possible error. The Americans call this the 'gotcha' effect. 'Course they do. The boating site experts also recommend that one change various parameters in the Function menu like for instance changing the theoretical voltage of the battery to 15V and the charge current to 1% (instead of 2%). These parameters will never be met but it does prevent the charger from going into float mode before it should. Here is an excerpt from that site: The Link 20 has an "gotcha" that isn't real obvious. When charging, the Link 20 considers the battery to be fully charged when two conditions are met. First the charging voltage must be at or above the entered parameter and the charging current must be below the percentage of the bank capacity that is also an entered parameter. In my case those parameters were 13.2V and 2%. 2% is about 9.2A for my bank of 460Ah. When these two parameters are met, the Link 20 blinks the top green LED indicating full charge, resets the AH used to zero, and recalculates and stores the charge efficiency factor for future charging. This can happen even if the used AH are not counted down to zero. Without realizing this was happening, my golf carts were being cheated of 10-20Ah at various recharge cycles during the month. Thus I thought my batteries were being fully recharged but actually they were reported to be full but were short. Over the month I calculated that they were about 140Ah down out of the 460Ah capacity. Thus I had a chronic undercharge. This undercharge showed itself as a low terminal voltage in the morning, sometimes as low as 11.9V when the voltage was 12.4-12.5 or so when retiring for the night. The scenario for the Link 20 gotcha is this: The charging current has tapered down to about 13A with 20Ah still to go with the charging voltage at 14.4V. Now one of the refrigeration units turns on drawing 5A. This causes the battery charge current to drop below the 2% threshold and after 6 minutes the Link 20 thinks the batteries are fully charged because the charge voltage is over 13.2V, the charge current is below 2% or 9.2A, and these conditions have been met for 6 minutes. Then to make matters worse, the recharge efficiency factor is recalculated to a higher value (ex. 0.97 vs 0.95) so the at the next charge cycle the Link 20 thinks that the batteries require fewer input AH for the used AH. This is not true of course, but it makes the under-charge condition worse. The fix for this gotcha is to set the Link 20 parameters to 15v and 1%. These parameters are not ever going to be met, so that means that the Link 20 will never think the batteries are fully charged until the AH used are fully counted down to zero. Also set the recharge efficiency factor to manual of 0.94 instead of the automatic setting of 0.95. This will stop the automatic recalculation and fix the recharge efficiency to be 0.94. The point is, I don't really understand all of this as much as I would like and would appreciate input from the experts out there. Incidentally, I did run this past the Enerdrive folk locally but didn't get much joy except to say that the fellow I chatted to wasn't at all happy about pushing the charge voyage to 15V. He recommended I max that at 13.5V which seemingly is the voltage at which my system floats (or so it seems). Apologies for the tortuous post... Cheers Brian
-
Hi Hermit, I found the fuse in the 'fuse rack' is for the Anderson outlets on the side of the van. There is one on the door side which I'm told is for an outside fridge like the Waeco or Engel and I had Kedron fit one to the opposite side as well. I intended using the Anderson plugs for my air compressor for reinflating after being off road and found the 15 amp fuse blew the first time I used it so swapped it out for a 30 amp one and have had no further dramas. My air compressor has a 20+ amp draw an startup I believe. Cheers Brian
-
Checked the battery yesterday. Almost eight weeks sitting idle under the cover. Synchronised the battery as per the monitor request. Battery 'Full' @ 13.8v. Monitor on the solar controller is static glowing green (Float Mode) and the Break Safe is on charge - red lamp glowing, Test button shows 'normal'. So, all in all, things look good and I expect there is at least some input from the solar panels despite the cover. I would imagine that if there was no input at all from the panels, the battery would slowly discharge over this time period because of the continual, albeit small, load on the system. Cheers Brian
-
Good point, Merv. Generally, I leave the 240v/12v switch in the middle i.e. neither on 12v or on 240v when parked up between trips. I do always check that the Break Safe Battery is charged (the red LED is glowing) when getting ready to travel. So far, so good. Bas, I'll keep monitoring the battery charge but if it remains at 13.7v, I'll hold off on the ancillary solar panel for the time being. Cheers Brian
-
Well, on second thoughts and after due consideration, I think I may have the answer to my own question! This is my dumbed-down version. The SOC is a calculated representation of battery status basically adding up what has gone into the battery and what has come out (simply speaking). There are inbuilt errors in this calculation and there is even a name given to this (maybe Peutz Factor?) which I can't remember just now but the fact is that that it exists. This is very likely why the monitor will ask you to 'synchronise' from time to time although there is, I believe, a certain amount of 'auto-synchronisation' taking place in the background but somehow this doesn't seem to keep up with what is actually happening. In any case, in my situation, I think the 13.7V is the more important number. And the monitor is asking me to Synchronise. If I had synchronised, the SOC would show 100% at 13.7V. Again, simply speaking, I think what happens is that the monitoring system has a look at the SOC and compares it to what the actual battery voltage is and if there is a discrepancy which happens from time to time, the it asks you to 'synchronise' so that the SOC and the voltage can agree. So, my reasoning is this: Since the only power load/drain on the battery at present is that being used to manage the solar controller and the monitor (minimal), as long as the battery can maintain a voltage of 13.7V, it would suggest that as small as the amount of input from the covered solar panels is, it is enough to maintain the battery at a very healthy charge. I'm very happy to be corrected in my thinking... Cheers Brian
-
I know this topic has been touched on in previous posts but thought I would resurrect it given concerns about climate change and all . Our van is parked off site when not in use and we do not have access to an external power source at that time. All user accessible power consumers are switched off. In the past, we never bothered about a cover but instead had a sail track fitted so that we could use a 90% shade cloth on the exposed aspect. Before our next trip, it would take us a few days to clean the van and most notably, the mould build-up on the roof was, if nothing else, particularly unsightly. Of course, everything else (including the tyres) was exposed to our harsh UV radiation. We decided to try a caravan cover (Unearth from BCF) and undoubtedly, the van is vastly cleaner prior to being used than before but whereas I thought the solar panels were charging despite being covered, I find I was probably deluded! The battery (3 x 130 Ah) was fully charged prior to parking it most recently; after 3 weeks the monitor was showing SOC 97% @ 13.7V (we had endured a particularly cloudy period prior to this); and after 6 weeks SOC is 93% @ 13.7V. So, there has been some decay in the battery but not enough for be to become terribly despondent at this stage although I am seeking methods of preventing this progressing further because it seems that there is potential for the battery to be damaged in due course. As I see it, there are several options to consider and I would appreciate input from KOG on which way to go: 1. Firstly, I know others have modified covers to insert transparent panels over the solar panels but I anticipate our cover will be used for a limited time considering it will deteriorate naturally and the cost of having panels inserted may not justify the process. 2. I have a generator but if I use it, I would have to monitor it while running (hours) which would be most inconvenient. I know that a generator running out of fuels starts 'pulsing' and the battery charger disapproves of this so much that it can frazz. 3. Use a separate, portable solar panel - possibly 10 W - mounted somewhere on top of the cover with the feed lines either plugged into the Anderson Plug or perhaps directly onto the solar controller. I suspect this will be enough to keep the battery topped up as the only thing using any power as far as I'm aware is the monitor. 4. Disconnect the battery when not being used. I don't see a downside to this. Perhaps there is one? 5. Use the van more often. No cover. No worries about keeping the batteries' heart beating. Cheers Brian
-
Hi Stewart, Sometimes the 'corners' of the locating pins can be too severe and you may have to take a file to them. You will not need to take a lot off - just enough to ensure the locating pin doesn't foul on the tongue where they will locate - so an angled profile is what you are aiming at. On occasion when I attempt to hitch up at a significant angle to the tongue/pin and I end up with the head not locating perfectly, a gentle persuasion with my foot against the hitch head helps a lot! Hope this all makes sense. Brian
-
Hi Mike, Oh man! Leaks are a real pain. Remember that the leak you find might well be coming from a very distant deficit in the leak-proofing on the roof or elsewhere. It's a real win if you happen to find the actual leaking spot as did Ted. You didn't say where the leak in the cupboard actually is: top or bottom etc.? You've done all the right things so far, but I would consider the solar panels to be a possible problem if the water is entering the top part of the cupboard. Incidentally, locating just where the water in the cupboard is coming from is a hassle too because it can enter the top and then run down the beading and joins and the 'appear' to be coming from lower down. If you don't have a front roof hatch, then I would suggest removing the front solar panel initially (easier than it sounds), inspect for possible leaking site but reseal all possible areas anyway! Good luck. Brian
-
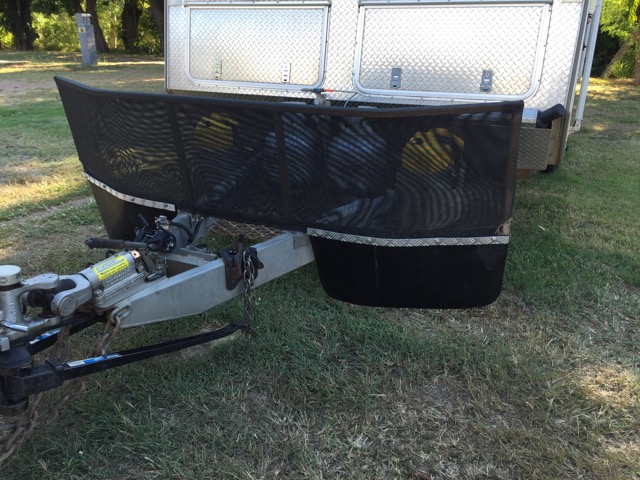
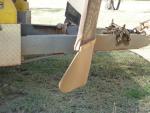
Thanks Lea, At last I've got round to it. My flaps are pretty much the same as Webby's shown in post #11 on this forum with the exception that mine cost me about $40 and some fun time. This shows the completed fitting: This shows the protection of the A-Frame behind the flap. What is not shown is that the stone guard on the Kedron doesn't extend laterally far enough to protect the outside edges of the van so that when viewed from the front, there is an edge of about 100mm which still cops it from the gravel/stones thrown up. Unfortunately, the diesel heater diesel heater filler spout is in that area - but so far so good with mine. Finally, you may not see it clearly, but I had my stone guard cut off at the A-Frame bracket and re-welded so that it would adopt a good forward lean. I note other vans' stone guards have an even more obvious forward lean. Brian

-
Must be all that Gibb dust, but I can't remember how to post images. It used to be very simple but now I'm very simple and am struggling to achieve that goal. Help please!
-
We have just completed the Gibb with my 'new' guards in place. We travelled about 1100km in total including trips to Mornington and other stations off the Gibb. I must say I'm very impressed indeed! The van front is almost clean and the A-Frame behind the flaps is virtually untouched. The red dust staining usually seen on the A-Frame after off-road travel is evident in front of the flaps and non-existent behind them. When travelling, my Clear View mirrors enabled me to see stones and gravel hitting the flaps and being deflected sideways. The combination of the extra forward tilt I applied to the stone guard together with the flaps resulted in no new dings to the back of the 'Cruiser. All in all, I'm very pleased with the result. Cheers Brian